| |
FILE FOLDER
MASK
Here is an easy way to make
a mask out of an ordinary manilla file
folder.
What you will need:
1 manilla file folder for
each mask you want to make
1 elastic or rubber band
pencil & scissors
tape
art supplies/materials to
decorate your mask (this can include
crayons, markers, paints, fabrics,
sparkles, feathers, etc.)

Figure
1 - the pattern drawn on the file folder.
Using the pattern
drawing as a guide, sketch your mask onto
the file folder with the fold of the
folder at the center of the mask face
(indicated by the arrow at the left of
the drawing.) You may need to make your
drawing larger or smaller, depending on
the size of your head...some
experimentation will help you decide just
how large to make it.
After you have
drawn your pattern on the file folder
with pencil, you can cut it out on the
dark lines. DO NOT CUT THE FOLD OF THE
FILE FOLDER OR YOU WILL HAVE TWO HALF
MASKS. The dotted line around the nose is
optional. You can cut it off completely
and let your own nose stick out there, or
you can cut it partially so that it
covers your own nose and sticks out some.
Also note that this pattern is for a HALF
MASK. If you want to make a whole face
mask, you can draw the jaw and chin on
the folder before you cut out the mask,
or glue or tape a jaw on.
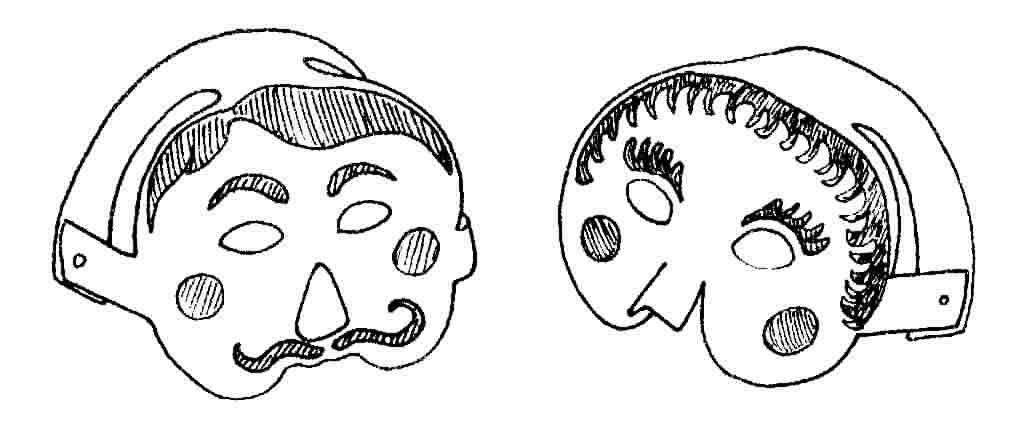
CUTTING THE EYES-
Before you cut the eyes, assemble the
mask as shown in Figure 2. Note that tab
#1 (shown in figure 1) connects to tab
#2.
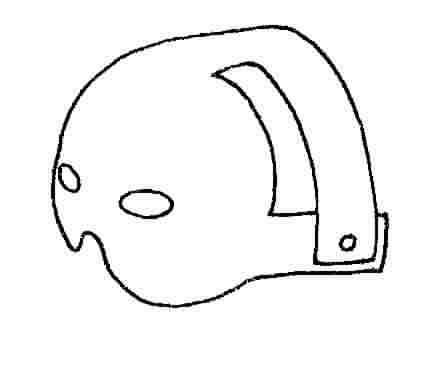
Figure 2 -
assembling the mask. Now that you have
cut out the mask, open the file folder
and bend down the top tabs to meet the
side tabs. You can tape the tabs together
temporarily or just hold them there to
try on the mask.
CUTTING THE EYES,
CONTINUED- It is handy to have a helper
here. Have a friend hold the mask up to
your face so that your nose fits in the
nose opening. Reach up and touch on the
mask the place where you think your eye
would be (you could pretend to try to
touch your eye through the mask) and mark
that spot for both eyes (don't poke
anything through the mask toward your
eye!) Now remove the mask from your face
and with a pencil or other sharp object
poke a tiny hole where you think the
center of your eye would be. Now try on
the mask again. even though the holes are
small, your should be able to see out of
them if they are in the right place.
Adjust their position by making new holes
(after removing the mask) if necessary,
then cut out your eye shapes. The larger
eye hole you make, the better you will be
able to see with the mask on.
DECORATING YOUR
MASK - Now you are ready to give your
mask the style and personality that you
want. You can paint, color or decorate
the face by gluing additional file folder
shapes on, or sequins or scraps of
fabric, feathers, etc. Be fanciful and
have fun! The side and top tabs will be
on the side and top of your head, so keep
that in mind when you are decorating the
flattened mask.
ASSEMBLING YOUR
MASK - Once you are done decorating your
mask you are ready for the final
assembly. All you have to do is attach
the tabs together again (like you did
when positioning the eyes) and attach the
elastic or rubber band so that it will go
comfortably around the back of your head.
GOING ON TO MORE
ADVANCED MASK PROJECTS - There are lots
of creative ways to expand your mask
making from this simple start. Below are
a few tips you can try.
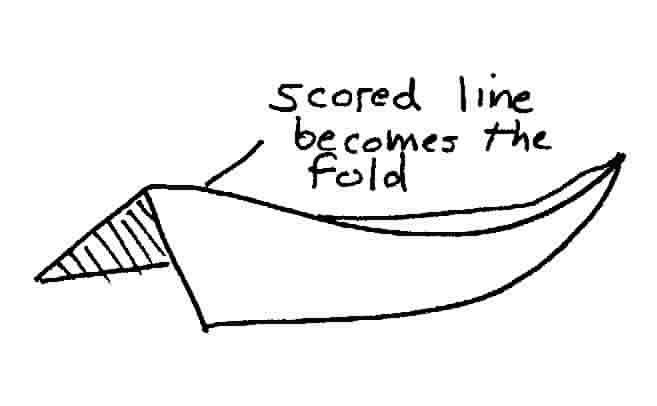
Scoring- If
you take a cut out shape of file board
paper you can score it, then lightly fold
it (to create a tent shape with the score
as the top of the tent.) A score is where
you take the point of the scissors and
use the point to draw the line, cutting
part way through the file card. Then when
you fold the file card, it folds on your
scored line. You can score the line in a
curve and get some very nice shapes that
way.
3-D shapes-
Once you get good at scoring,
you can create animal faces and other
shapes by cutting and gluing various
shapes of file board paper. You can build
up noses, brows, make 3 dimensional ears,
etc. I would suggest a book on paper
sculpture from your local library; it
will give you many tips on making 3
dimensional shapes for your masks.
|
Keep
informed of Magical Moonshine
performances and new projects:
Email a
request to be on our email list

Planning
that Special Event?
Whether it's a
holiday affair, a birthday celebration,
an arts festival or fundraiser, Magical
Moonshine offers a world of exciting
choices!
Interested in a show?
Email us or call
707-363-4573.
Choose
your type of event for more information-
Small shows
for private parties, holiday shows,
social clubs, family stage at arts
festivals, etc.
Educational
and Mainstage shows for schools,
festivals, fundraisers, theaters.
Special
shows for younger audiences.

Adult
birthdays, dinner parties, soirees.
|